Wednesday, October 29, 2014
Thursday, October 16, 2014
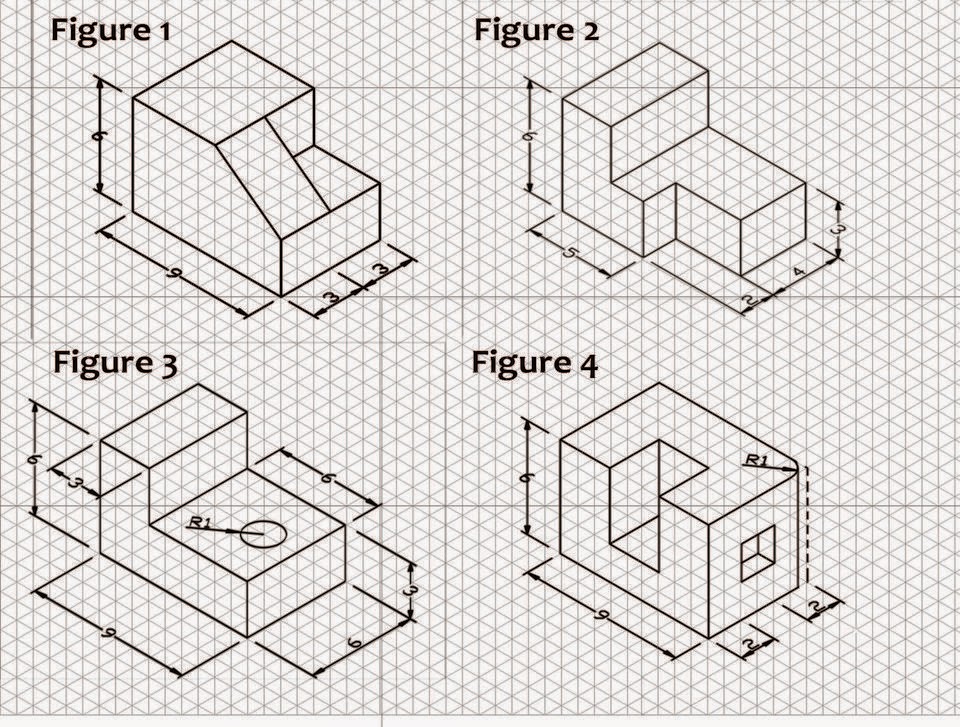
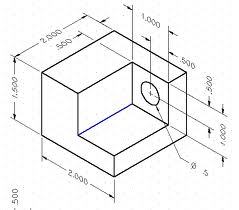
Isometric sketching
This lesson is for the following classes:
- Period 1: Civil Engineering and Architecture
- Period 2: Architectural Drafting
- Period 3: Residential Structures
- Period 7/8: Introduction to Engineering Design
- Period 10: Introduction to Engineering Design
Instructions:
- Please pick up a pencil and two sheets of Isometric grid paper from the teachers table
- Complete the sketches shown below.
- For each object, use shading to enhance the sketch
- Make sure that you print your full name and the class period for every sheet of paper that you submit for grading
- There are 6 objects to sketch and shade with each sketch being worth 16 points
- If you click on the image it will appear larger in a separate window
 |
 |
 |
Monday, October 13, 2014
IED Unit 1 exam
Directions: Click below to be taken to the exam posted on Google drive.
Use a piece of paper to design an answer sheet with 21 answers. Answer each question by choosing the MOST correct answer.
CLICK HERE TO BE TAKEN TO THE TEST
GOOD LUCK!!!
Use a piece of paper to design an answer sheet with 21 answers. Answer each question by choosing the MOST correct answer.
CLICK HERE TO BE TAKEN TO THE TEST
GOOD LUCK!!!
 | ||
| http://www.wired.com/images_blogs/thisdayintech/2010/08/condor.jpg |
Tuesday, October 7, 2014
Periods 1 and 2 lesson for Wednesday October 8, 2014
This lesson is for Periods 1 and 2 for Wednesday October 8, 2014
Lesson title: Introduction to 2 point perspective drawing
Instructions:
Lesson title: Introduction to 2 point perspective drawing
Instructions:
- Please get some paper, a pencil, and eraser, and a straight edge ( a ruler or a plastic triangle "set square" are all fine).
- Next o the link below which will take you to a step by step tutorial on how to make this type of sketch
Click here
Monday, June 2, 2014
Introduction to Engineering Design Final projects
These links will take you to the presentations of student work. Click on the student's name to see their work:
Katrina and Arianna's project
Katrina and Arianna's project
Tuesday, May 13, 2014
.jpg)

Monday, May 12, 2014


Monday, April 14, 2014


IED Unit 6 Reverse Engineering terms
Directions: Please use this table to study the Reverse Engineering terms for a quiz on Thursday.
| Key Term | Definition |
| Aesthetic | 1. Concerned with beauty or the appreciation of beauty. 2. Of pleasing appearance. |
| Asymmetry | Symmetry in which both halves of a composition are not identical. Also referred to as informal balance. |
| Balance | A condition in which different elements are equal or in the correct proportions. There are three types of visual balance: symmetry, asymmetry, and radial. |
| Color | The property possessed by an object of producing different sensations on the eye as a result of the way it reflects or emits light. |
| Contrast | The state of being noticeably different from something else when put or considered together. |
| Element | A basic constituent part. |
| Emphasis | Special importance, value, or prominence given to something. |
| Form | 1. Having the three dimensions of length, width, and depth. Also referred to as a solid. 2. The organization, placement, or relationship of basic elements, as volumes or voids in a sculpture, so as to produce a coherent image. |
| Gestalt | The principle that maintains that the human eye sees objects in their entirety before perceiving their individual parts. |
| Graphic Design | The art of combining text and pictures in advertisements, magazines, books, etc. |
| Harmony | 1. The quality of forming a pleasing and consistent whole. 2. Agreement or concord. |
| Message Analysis | The process of deciding what information needs to go into the graphic design, as well as how to effectively use the design elements and principles to present the information. This analysis is based on a thorough analysis of the audience. |
| Pattern | A repeated decorative design. |
| Pictograph | A pictorial symbol for a word or phrase. |
| Principle | The method of formation, operation, or procedure exhibited in a given instance. |
| Proportion | 1. The relationship of one thing to another in size, amount, etc. 2. Size or weight relationships among structures or among elements in a single structure. |
| Radial Symmetry | Symmetry about a central axis. |
| Reverse Engineering | The process of taking something apart and analyzing its workings in detail. |
| Rhythm | A regularly recurring sequence of events or actions. |
| Shape | The two-dimensional contour that characterizes an object or area, in contrast to three-dimensional form. |
| Space | 1. The dimensions of height, depth, and width within which all things exist and move. 2. A free or unoccupied area or expanse. |
| Symbol | A thing that represents or stands for something else, especially a material object representing something abstract. |
| Symbolism | 1. The use of symbols to represent ideas or qualities. 2. The symbolic meaning attached to material objects. |
| Symmetry | The correspondence in size, shape, and relative position of parts on opposite sides of a median line or about a central axis. Also referred to as formal balance. |
| Texture | The feel, appearance, or consistency of a surface, substance, or fabric. |
| Typography | The style and appearance of printed matter. |
| Unity | The state of being united or forming a whole. |
| Value | The lightness or darkness of a color in relation to a scale ranging from white to black. |
| Variety | A thing which differs in some way from others of the same general class. |
Monday, March 17, 2014
IED Monday and Tuesday march 17 and 18 problems
 |
| This is Tuesday's assignment. If you are sketching these, then copy as seen and add dimensions Neatly!! |
 |
| This is Monday's assignment. If you are sketching this then add dimensions neatly!! |
Saturday, March 15, 2014
CEA Periods 1 and 3 Assignments for Monday and Tuesday March 16 and 17, 2014
Monday's Assignment: You are to complete the research assignment on Green Building and Sustainable Design. The work sheet will be given to you by your teacher. These resource links should be helpful for answering the questions. You may either answer the questions in a word document or on Engineers notebook paper. The assignment will be checked on Wednesday or Thursday March 18 or 19, 2014 and is worth 100 assignment points.
Here are the links:
Question1:
Question2:
Question3:
Question4:
Question5:
http://www.smartplanet.com/blog/global-observer/in-melbourne-a-push-for-daylighting-in-architecture/
Tuesday's Assignment:
Visit the following websites:
U. S. Department of Energy Efficiency & Renewable Energy website at: Whole Building Design Guide at:
Monday, March 3, 2014
IED: Using the Array ( Pattern) tool
1.New
sketch
2.Rectangle
1.5 high x 2.0 wide in upper left corner
3..25
from left edge and .25 from top edge
4.Click
on rectangular pattern tool
5.Click
on all sides of the rectangle
6.Click
on direction one and click on top edge click on the green direction arrow to
have the rectangles repeat to the right
7.Type
in 6 for number of rectangle and then adjust
the number for spacing until 6 rectangles fit into the overall shape
8.Click
on direction 2 and then click on the green arrow to make sure the rectangles
repeat below.
9.In
the top box type 5 for quantity and then
adjust the number in box 2 until there are 5 rows of rectangles in the top half
of the shape
10.Raise
your hand when you are done
Friday, February 28, 2014
Lesson's for Friday February 28, 2014
To the student:
Please read and review today's lesson for your class.
CEA periods 1and 3:
Open your foundation quiz revit files. Please do the following:
If you did not complete adding the foundation walls, footing, and basement then do this first.
Next add windows, doors, interior partition walls, and components such as bathroom fixtures (toilets and bathtubs, etc).
Use today's time to practice laying out a floor plan that will group the three essential areas ( living, sleeping, and working) into a design that will look good but also be logical. Save your work and this will be checked on Monday.
POE Period 2
Please open your statics file that is saved on your Z drive.
Read and review the Free Body Diagram power point.
Next open the free body diagram activity ( it's a word document also in the statics file)
Read and review the activity.
Use engineer notebook paper ( found on the shelf by the smart board ) and copy down the free body diagram problems on the activity.
Using the power point as a guide try to solve the problems on the activity sheet.
Put your engineer notebook drawings in your portfolio.
This will checked on Monday.
IED Periods 7/8 and 10:
Please open a new standard IPT file in auto desk Inventor.
You are to draw your computer LCD screen.
Use a ruler to find approximate width, height, and depth measurements
Then use your skill in Inventor to create a realistic replica of the computer LCD monitor.
Include the base as well.
Next create a DWG file and show front. Top, side and isometric views.
Finally dimension your DWG file.
Save these drawings in your Z drive.
This work will be checked on Monday
Tuesday, February 11, 2014
IED Measurement Corrections
Directions: Use these images to compare your results for the measuring activity. Convert your fractional inch answers to decimal and see if you were correct in your measurements.


Wednesday, January 8, 2014
IED Project #4: Bird House Modeling
Today we start our next project which is designed to meet two needs:
- First, to teach you about the various kinds of modeling that is done in the fields of design and engineering.
- Second, to hopefully manufacture some nice bird houses that we will place around campus to encourage an increase of bird-life . If we can afford it, we will make our bird houses out of ceder, a wood that has naturally moisture resistant qualities.
To get started, please CLICK HERE
Monday, January 6, 2014
POE Stirling Engine project: January 6 to January 18, 2014
POE
ENERGY PROJECT: Stirling Engine
Introduction: Welcome back and Happy New Year! If you remember,
we reviewed a Youtube video (Click here to view) of a Stirling engine design
that we will be making this week and next week (January 6-January 17). A
stirling engine is a heat displacement engine and not an internal combustion
engine like the one that powers a gas driven automobile. The stirling engine
cycle begins by using pressure and heat to move a piston (displacer) upward
within an enclosed chamber. The second part of this cycle occurs when the
heated gas cools as it moves away from the source (the candle) and a flywheel
creates a counter weight which pushes the piston back down. This up and down
motion is called Reciprocating motion and is the first step in the conversion
of heat energy to mechanical energy. A simple machine called a crank attached
to the piston arm redirects the up and down reciprocating motion into the
circular (rotary) motion. If you remember; once we have rotary motion we can do
all sorts of good things like move objects, generate electricity, pump fluids
or gasses, and do other types of work (sawing and drilling are two examples).
How we will make this project:
Monday January 6, 2014
Step 1: Please click here to view the website that will
assist you in creating an accurate parts list. Return to this blog when you are
done reviewing the site
Step 2: Use an excel spreadsheet to create a parts list.Save the file in your Z drive with the file name SE parts list You
will review the website procedures as well as the YouTube video to create your
list. For each part, you will indicate the material, size and quantity of each
part. See the table below:
PART NAME
|
MATERIAL
|
SIZE
|
QUANTITY
|
FRAME VERTICAL PIECE
|
WOOD
|
2
|
|
Tuesday January 7, 2014
Step 3: Construct the Frame:
What tools will you need in order to measure, mark out, cut,
drill, and assemble your project?
Make a list of tools and then gather those tools to begin.
Make sure that you return all tools when completed as well as clean up your
work space
Wednesday January 8, 2014
Step 3 Completion: You have until the end of class to
complete your frame assembly. If you do not complete it, you should strongly
consider staying after school from 2:26 -3:00 to complete.
Thursday January 9, 2014
Step 4: Can piston construction: Use the material provided
to cut and glue your piston together. What tools will you need for this step?
Review the video and the construction website and make a list of tools. Gather
the tools and get to work! You have only today to complete this step!!
Friday January 10, 2014
Step 5: Cut and shape the crank shaft: Review the video ( click here) and
make a list of tools that you will use. Use scrap pieces of hanger wire to
practice making the shaft bends before you make your actual crank shaft. Take
your time on this part. It has to be correct!!!
Monday January 13, 2014
Step 6: Construct the balloon diaphragm and connecting rod
assembly: Review the video and make tool list. Gather your tools and get to
work. Make sure that you replace all tools and clean up your work space at the
end of class
Tuesday January 14, 2014
Step 7: Flywheel construction: Review the video, gather
tools and mark out and cut your flywheel. This step should only take 15 minutes
so use the remainder of the time to complete any unfinished past steps.
Wednesday January 15, 2014
Step 8: Project Assembly: Review the video carefully so that
you do not waste time assembling the stirling engine out of sequence
Thursday January 16, 2014
Step 9: Test your project: Insure that all safety equipment
is in place before you test your project. Make any necessary adjustments. Record
your results. What happens as the can gets hotter? How many revolutions per
minute does the Stirling engine generate?
Friday January 17, 2014
Project write up: Your project write up should be completed
using Microsoft word and include the following:
- Parts list inserted from your excel spread sheet
- Steps taken to complete the project: You can copy/paste this from the blog but make sure to edit and format the list so that it looks attractive and is in either bulleted or number list format
- A paragraph titled Project Report which should include: Why you made the stirling Engine ( to learn about energy conversion) ,the process of making the Stirling Engine including and problems that you faced and how you solved them, and your test results on the performance of your Stirling engine.
- An image of your project
- A sketched diagram of the project ( draw this on a separate sheet of paper and then scan or photograph it and insert the image into your report)
Subscribe to:
Posts (Atom)