Click to see the you tube video of the prototype
Friday, April 22, 2011

Design and Drawing for Production: Term 4 Final Project: The Mouse Trap Car
These images have been placed on the blog for you reference. If you click on the image it will open in a new window.You can then enlarge it to see the notes more clearly.
To make changes or add information to the title block:
1. Expand ANSI Title block (click on the +)
2. Right click on edit field text
3. Click on the icon that looks like a sheet of paper in the upper right corner of the edit box
4. Click on Properties
5. Fill in all the information:
6. For Author: Type your Full name
7. For Manager: Type Mr. McGinty
8. For Title: Type the name of the object you will be placing onto your Sheet (example: Mouse Trap Rear CD Wheel)
This sheet gives instructions on how to insert a center line or center point. To insert text:
1. Click on annotate in the main menu of a standard dwg file
2. Then click on the big bold A.
3. Then click where you would like the text to appear. A dialogue box will appear
4. Type your text.
5. Click Apply
6. Press escape (ESC) twice
7. Then place your mouse over your text
8. You can then select the text and adjust its location

This image shows what your laser engraver dwg file should look like. What components you decide to laser engrave, depends upon each teams design.
To make changes or add information to the title block:
1. Expand ANSI Title block (click on the +)
2. Right click on edit field text
3. Click on the icon that looks like a sheet of paper in the upper right corner of the edit box
4. Click on Properties
5. Fill in all the information:
6. For Author: Type your Full name
7. For Manager: Type Mr. McGinty
8. For Title: Type the name of the object you will be placing onto your Sheet (example: Mouse Trap Rear CD Wheel)


This sheet gives instructions on how to insert a center line or center point. To insert text:
1. Click on annotate in the main menu of a standard dwg file
2. Then click on the big bold A.
3. Then click where you would like the text to appear. A dialogue box will appear
4. Type your text.
5. Click Apply
6. Press escape (ESC) twice
7. Then place your mouse over your text
8. You can then select the text and adjust its location

This image shows what your laser engraver dwg file should look like. What components you decide to laser engrave, depends upon each teams design.
Thursday, April 14, 2011
Foundations of Technology Lesson for Friday April 15, 2011

Foundations of technology
Good Afternoon Students!
Please open a Microsoft Word or Power Point presentation
Save as Your name DUCKS
NOw Click here http://tafein2009.files.wordpress.com/2009/03/space2.png?w=500
Use the Drawing tools to make this picture!
Have fun but work Hard!!!
Remember No FaceBook!!
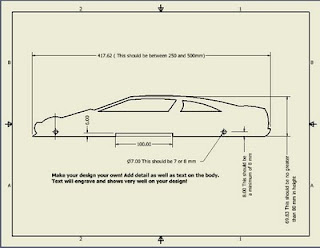
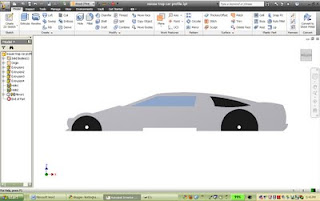
Designing your Mouse trap car Profile for laser Engraving
DDP: Blocks 3 and 4 for Friday April 15, 2011
Good Morning/Afternoon:
1. Logon to computers
2. Click on Autodesk Inventor to start the program
3. When the program opens, click on the Inventor Icon in the upper left corner of desk top and UN-click on open. Open the Auto-desk inventor file that you started on Wednesday (the file was saved as Mouse trap car profile….or what ever name you saved it.)
4. Use the car profile that you researched on Wednesday to assist you in designing the car.
5. Make sure you save your file in your Z drive.
6. Take this lesson seriously! Use your knowledge of Inventor to create a beautiful design!
7. If you draw details like doors, side vents, door handles then make sure you do the following:
a. Make the profile (outer shape) first
b. Extrude Cut the profile from the 500 x 75 piece of balsa wood
c. Click on the face and right click new sketch
d. Draw the detail
e. Finish sketch
f. Extrude cut or join 1 mm
g. When you are done please send an email to:
jmcginty@scsd.us
In the subject place your name and “finished with profile”
Example: Dylan finished with profile
Good Morning/Afternoon:

1. Logon to computers
2. Click on Autodesk Inventor to start the program
3. When the program opens, click on the Inventor Icon in the upper left corner of desk top and UN-click on open. Open the Auto-desk inventor file that you started on Wednesday (the file was saved as Mouse trap car profile….or what ever name you saved it.)
4. Use the car profile that you researched on Wednesday to assist you in designing the car.
5. Make sure you save your file in your Z drive.
6. Take this lesson seriously! Use your knowledge of Inventor to create a beautiful design!
7. If you draw details like doors, side vents, door handles then make sure you do the following:
a. Make the profile (outer shape) first
b. Extrude Cut the profile from the 500 x 75 piece of balsa wood
c. Click on the face and right click new sketch
d. Draw the detail
e. Finish sketch
f. Extrude cut or join 1 mm
g. When you are done please send an email to:
jmcginty@scsd.us
In the subject place your name and “finished with profile”
Example: Dylan finished with profile
Sunday, April 10, 2011
Foundations of Technology Lesson for Monday April 11, 2011 (Block 5)
Foundations Of Technology
Good Afternoon Students!
1. Please Open a Microsoft Power Point File
2. Use the Drawing tools to make this image.
3. Save your project as: Your name Book Cover project

Good Afternoon Students!
1. Please Open a Microsoft Power Point File
2. Use the Drawing tools to make this image.
3. Save your project as: Your name Book Cover project

Monday April 11, 2011 DDP and Foundations of Technology Lessons
Blocks 3 and 4
Monday April 11, 2011
DDP Lesson
Hello Students:
I will not be in class today so please use the instructions below to complete the lesson. Remember to try your best and work together.
Instructions:
- Open an Autodesk Inventor IPT file (you will do this instruction for each of the 9 parts that you will be drawing)
- Get the Hands on AutoCAD LT text book from your teacher. The books are stacked on a table in the back of the gw3 classroom
- You are to draw Problems 1,2,3,4,5,6,8,and 9 on pages 229-231
- DO NOT DO PROBLEM 7
- Each problem should be colored the same color shown in the book.(Use the as material button on the top menu)
- Save each IPT file as either the problem number (1,2,3,4,5,6,8,9) or the figure number (5-85,86,87,88,89,90 to92, 93)
- Remember to save in your “Z” drive as these will be checked by Mr. McGinty on Wednesday April 13, 2011
- All of these problems have holes that need to be placed on the objects. Use the Hole tool in 3D mode of inventor (3D mode is when we Extrude or revolve, for example…its what we do after we click “finish sketch”)
- Remember there are 5 instructions to locate a hole:
- Surface
- vertical reference line and dimension
- horizontal reference line and dimension
- the depth of the hole
- the diameter of the hole
- Here are some hints for specific problems
- For the angle on Problem 6, click on the dimension tool in sketch mode and then click on one line and then the adjacent line. This will give you the angle dimension. Set the angle to 135 degrees

- For problem 8, try to draw the profile that is shown on the right image. Then use the revolve tool. ( a profile is the shape of the revolved object. To remember, look at the wheel that we made in class last week)

- Good luck with this assignment!!!
Tuesday, April 5, 2011


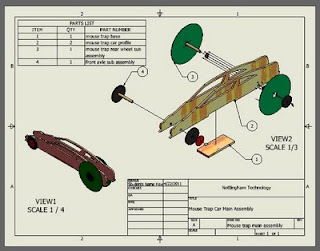
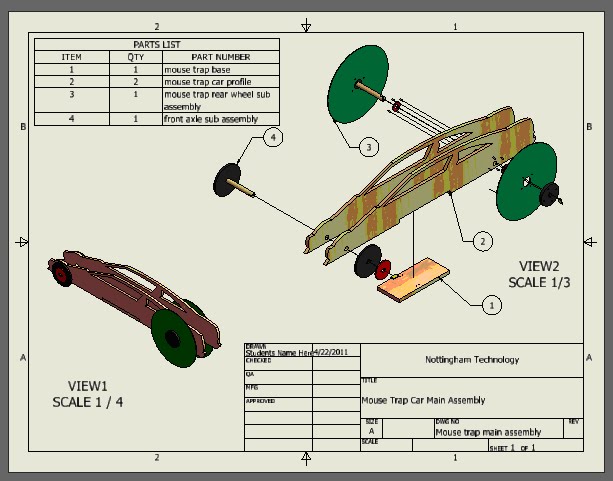
The term 4 final Project is going to be the design and construction of a Mouse Trap Competition car. Working in a team of three students, you will use the12 step PLTW design process as a guideline to design and construct a mouse trap car for speed, distance and accuracy. Beginning in early May, we will hold a class competition. The top 2 winners of each DDP class will then compete for the Nottingham Cup. The top three winners of the Nottingham Cup will go on to the district Competition to be held on May 11.
Each team must produce a 5 page technical document that meets the SECME (South East Consortium of Minorities in Engineering) constraints that can be found at: http://www.secme.org/docs/competition/2010/guidelines-elementary-mousetrap.pdf
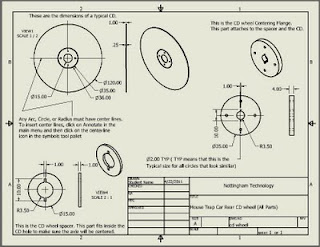
Each team must also produce the following sketches and Autodesk Inventor Drawings:
- Concept sketches of 5 possible ideas
- An Isometric Sketch of the chosen idea with color and highlighted in Fine tip sharpie
- A multi-view sketch of the Final idea that is 1:2 SCALE and dimensioned.
- Inventor IPT files of all Parts that will be in your final design
- Inventor Assembly (IAM) and Presentation (IPN) files of the Final design
- Inventor DWG files Printed that include multi-view and Isometric drawings of each part.
- One part will include a sectioned view of the part
- One part will include a detailed section of the part
- One part will include an Auxiliary view of a part
Subscribe to:
Posts (Atom)