Wednesday, November 30, 2011
Monday, November 7, 2011
CEA TERM 1 EXAM
Questions 21 and 22: Image of a dormitory at Syracuse University
Questions 23 and 24: Image of SU New House 3 building found at:
Questions 25 and 26: Image of the National Grid (formerly known as the Niagara Mohawk) found at:
Questions 27 and 28: Image of the Golisano Children’s Hospital in Syracuse , New York
Questions 29 and 30: Image of a Green home that will possibly be built on the west side of Syracuse
Wednesday, October 19, 2011
POE Block 3 October 20, 2011

Block 3 POE Lesson for Thursday October 20
Directions: Copy and paste the questions below into a Microsoft word document. Save the document as your name: Apollo 13 activity (example: Antwon Apollo 13 activity). Answer these questions as you watch the movie Apollo 13. This activity will be checked off on Monday October 24, 2011.
1. What was the Apollo space program
2. When did the Apollo space program take place?
3. Why did the United States Government develop the Apollo space program?
4. What does NASA stand for?
5. What was the goal of the Apollo space program?
6. Who was Neil Armstrong?
7. Why did the Apollo Astronauts spend so much time practicing in the simulator?
8. What is the name of Part A of the Apollo space craft?
9. What was the name of Part B of the Apollo space craft?
10. What did Jack Swagart do that caused the explosion on the Apollo space craft?
11. Once the explosion occurs, both the astronauts and the engineers on earth do not know what has happened. What do they do initially in reaction to this emergency?
12. After this initial reaction, what do the astronauts begin to do?
13. What do the engineers on earth begin to do?
14. Why does it become necessary for the astronauts to leave the command module and move to the lunar module?
15. What does the leader on earth mean when he says: “Failure is not an option”?
16. Why do the engineers have to use crazy materials like socks, tape, and plastic bags in order to fix the CO2 problem on the Apollo space craft?
17. How do they communicate their design to the astronauts in space?
18. How did both the engineers and astronauts use numbers through out the problem solving process?
19. How does the Apollo space craft simulator on earth become such a vital piece of technology in saving the astronauts in space?
20. Why did the US government stop sending astronauts to the moon?
Tuesday, October 11, 2011
DDP SKETCHING IN ISOMETRIC OCTOBER 12, 2011
Use the Isometric grid paper in the back of your engineers notebook to complete these sketches. Use the scale of 2 grid lengths is equal to one inch. So if the drawing indicates 3 (thats inches) then you will make the measurement 6 grid lengths long (3 X 2).


Monday, October 3, 2011
Welcome to AVID in Room 200B !!
Welcome to AVID! “But wait a minute”, you ask “what is AVID?” Click on the Link and read about AVID. When you are done click on the back button to come back to this web blog and then please do the following:
Click here to read about AVID
1. How would you describe AVID to a peer?
2. Why are you in AVID?
3. Do you have any past experience in AVID and if so, would you please describe this experience?
4. What are your expectations from this class?
5. What are you willing to give towards this class?
6. What are your general plans for this school year?
7. What are your academic plans for this school year?
8. What are your college plans?
Click here to read about AVID
- Open a Microsoft word document
- Save the document in your Z drive.
- Create a new folder that you will name AVID 2011-2012 (raise your hand if you are not sure what to do here…most students don’t)
- Name the file your name what is AVID doc (example: tom what is avid)
- Now you can copy and paste the questions below into your word document and then take as much time as you need to carefully answer them
- COPY/PASTE these questions:
1. How would you describe AVID to a peer?
2. Why are you in AVID?
3. Do you have any past experience in AVID and if so, would you please describe this experience?
4. What are your expectations from this class?
5. What are you willing to give towards this class?
6. What are your general plans for this school year?
7. What are your academic plans for this school year?
8. What are your college plans?
Sunday, September 25, 2011
CEA LESSON 1.1 Quiz
Instructions: Use the Answer sheet provided to answer questions about the images below.
Image 1:

Image 2:

Image 3:

Image 4:

Image 5:

Image 6:

Image 1:
A residence in Florida , USA
Image 2:
A dining facility in an unknown location
Image 3:
A residence some where in the USA
Image 4:
A stadium in Beijing , China
Image 5:
A residence on the eastern seaboard of the USA
Image 6:
The lobby of an old theater in Philadelphia, Pennsylvania USA
Friday, September 23, 2011
POE BLOCK 4 FRIDAY(9/23) and MONDAY BLOCK 3 (9/26)
We are nearly finished with the mechanical advantage of simple machines! A great resource and review for the MA of Levers and Pulleys can be found at the Khan Academy. These short video's do an excellent job of teaching these concepts:
Click here for the video on Pulley's
For Block 4 (odd) students the Quiz will be on Tuesday September 27, 2011
For Block 3 (even) students the quiz will be on Wednesday September 28, 2011
What will be on the quiz:
Calculating IMA, AMA, and static equilibrium for first, second, and third class levers, inclined planes, wheel and axle, and pulleys.
Wednesday, September 14, 2011
DDP: September 15, 2011: Innovation versus Invention
Good morning !
Would you please click on this link:
Would you please click on this link:
No Innovator’s Dilemma Here: In Praise of Failure
Monday, September 12, 2011
DDP Lesson 1.1.1 Brainstorming ideas

Use this image as a guide to make a similiar sketch on the paper provided.
If you are looking for the POE post then click here.
I f you are looking for the CEA post then click here
Sunday, September 11, 2011
CEA: Unit 1.1: History of Architecture and Civil Engineering
CEA: Unit 1.1: History of Architecture and Civil Engineering
September 12 and 13, 2011
Today we are going to gain a basic understanding of the historical development of civil engineering and architecture. To get started, would you please do the following:
1. Open a Microsoft word document.
a. Save the document as: your name ancient architecture (example: Myquan ancient architecture)
2. Complete a web image search of “ancient buildings”
3. Identify one building or structure that you find interesting
a. Copy and paste the image of this building/structure onto a word document
b. Copy and paste the web address of the site
4. Explore the web site where you found this image and attempt to find the following information:
a. where the structure is located In which ancient culture, empire, or dynasty was it constructed
b. Why was the structure built?
c. Explain what about this structure you found interesting ( why did you choose this structure/building over the other search results appeared?)
5. Make sure that your grammar and spelling are correct
6. Type the following in the upper left corner of the document:
a. your name
b. CEA Ancient Architecture Research
c. Date
d. Your Class ( CEA Block___ ODD/EVEN)
7. Print the document using the 200 b Lexmark printer
8. Home work:
a. You are to use this document in order to complete an annotated sketch of this design. Please use the information in today’s lesson about the civil engineering and architectural innovations (arches, vaults, columns, lentils, etc.) to describe your sketch. This sketch is due by Friday September 16, 2011
POE: Week of September 12 – 16
This week’s goal is to complete 1.1.1, 1.1.2, 1.1.3, and 1.1.4. in your POE curriculum and to prepare for an email interview with an engineer.
Today’s work (Part 1): Write a letter to an engineer with questions about the Engineering profession:
The purpose of this letter is to gain an understanding of the engineering profession to help you in this class and to help you explore career possibilities
Please follow these steps:
1. Open a Microsoft word document:
2. Save the document in your Z drive POE folder as your name email interview (example: Renaldo email interview)
3. In the word document, write an introductory paragraph. Include your name, your year in high school, what HS you attend and its location, the purpose of your email to this engineer, and a polite request that this person agree to answer the questions you have prepared below:
4. Next, Copy and paste the information below into your word document
Professional Background
A. Gather the information below.
a. Interviewee name:
b. Interviewee’s specific degree:
c. Interviewee’s place of employment:
d. Interviewee’s email address and/or phone:
Professional Interview
B. Ask interviewee the questions listed below and record exact responses in your engineering notebook. If you wish to ask additional questions, seek instructor approval.
· Please describe your engineering field.
· What is your current job title?
· Please describe your particular job and duties.
· What is your average work schedule?
· Starting with high school, describe your educational background chronologically.
· If you had it to do over, related to your career or education, would you do anything differently?
· What advice would you give to me as someone interested in pursuing a career path similar to yours?
STOP COPY/PASTE HERE
5. Now, just below the copy pasted section, write a short thank you paragraph to the engineer that is going to answer these questions. Thank the person for taking the time to provide you with this valuable information. You can also add that the information he/she gave you, has helped you to better understand the engineering profession and that this will help you in this class as well as in your career exploration.
6. Close this word document. We will use this document next week
Today’s lesson (Part 2)
There will be a short presentation by your teacher when we have all completed writing these letters. If you are waiting for the others, please open your POE curriculum and do the following:
1. Click on Unit 1.1 ( you may have to click on the + symbol next to Unit 1 to expand unit 1)
2. Scroll to the bottom of the web page
3. In presentations, find the Simple machines link
4. Click on it to open the power point.
5. Begin to review the slide show.
The teacher will review this presentation with you and then you will work in your teams to produce the following simple machines using the fischertechnik engineering kits:
· A first class lever
· A second class lever
· A third class lever
· A gear train with an Idler gear
· A chain and sprocket system
· An inclined plane
This week’s home work:
You are to make annotated sketches of the 6 simple machines in your engineer’s notebook:
1. Lever
a. Include the locations of the fulcrum, effort and resistance in the three classes of levers ( make three sketches)
2. Wheel and axle
a. Include the labels and locations of the wheel circumference, axle circumference, and wheel center.
3. Pulley and belt system
a. Sketch a fixed and movable pulley combination and the mechanical advantage of this system indicating the effort and resistance forces.
4. Inclined plane
a. Include the effort and resistance ( use arrows)
5. Wedge
a. Include the effort and resistance ( use arrows)
6. Screw
a. include the thread pitch ( threads per inch) and how that effects MA
The following websites are excellent resources for simple machines including interactive games, great diagrams, and information.
http://www.mos.org/sln/Leonardo/LeosMysteriousMachinery.html
This is the End of POE: Week of September 12 – 16 post
This is the End of POE: Week of September 12 – 16 post
Monday, September 5, 2011
Welcome to the 200B PLTW lab!!
Wednesday, THURSdaY, and Friday, SEPTEMBER 7, 8, 9, 2011
Introduction to:
· Design and Drawing for Production (DDP)
· Civil Engineering and Architecture (CEA)
o (On your class schedule, it will list as Architectural Drawing I and Architectural Drawing II)
· Principles Of Engineering (POE)
Welcome to the Project lead the Way Engineering Curriculum! Which ever course you have been scheduled for will teach you the basic skills needed in the design and engineering professions. The DDP course will also meet your art credit needed for graduation and if you do really well, you can also qualify for college credit through the Rochester Institute of Technology (RIT).
What today’s lesson will cover is:
- Short Video on PLTW
- An overview of Project lead the Way Courses and the PLTW learning environment including:
- Opening and using the Curriculum on your desktop
- Opening curriculum lessons, re-naming, and saving them to your “Z” drive PLTW folder.
- Preparing, Printing, and submitting assignments
- Opening and previewing the software to be used in this course
- The basic behavior expectations while in PLTW lab 200B
- How you will be marked
- What resources you will need for this course
- Reviewing the course outline for UNIT 1 including the Unit 1 exam
Expectations
- Be early for class: “If you are on time then you are late”
- Be prepared for class with all of the items required (see supply list below)
- Respect teachers and classmates by actively listening during the lesson time
- When working in teams, only talk with your teammates within your row
- At the end of class, return your work space to the condition that you found it in
- Computer logged off
- Keyboard and mouse placed on top of computer
- Chair pushed in
- Any tools, materials, or project components put away in appropriate location
- Any projects put your assigned project shelf
- Any debris, scrap paper/card/foam board is discarded in the recycling bins
- Please follow the Thumper rule:
- “If you don’t have anything good to say, then don’t say anything at all”
- This refers to avoiding hurtful and disrespectful words and actions. If you hear the teacher make a factual error then, by all means, respectfully bring his attention to this!
- Follow all the rules for safe computer use
- There is a list of Computer rules that are located at each computer as well as further down this blog post.
- Unfortunately, Students who violate some of these rules, have, in the past, either been removed from the class permanently with a failing grade or lost computer privileges in the SCSD
- Please refrain from computer use when the teacher is instructing the class unless using the computer is part of the instruction
- When or if you complete an assignment early, use the curriculum and go on to the next activity. Refrain from using class time for your social networking or game playing.
- Make sure your cell phone is turned off and out of sight. Cell phones that are visible will be collected and placed in a secure location for the duration of the class time.
- Do not bring any food or beverage into the computer room.
200B Computer Use Expectations
1. Use the Internet only for research related to class work This computer does not belong to you; therefore do not place your own screen saver or desk top image onto the monitor
2. Only Computer games related to PLTW curriculum are allowed and only when directly related to a specific lesson.
3. There is not enough time in the PLTW curriculum lessons to use social networking so please refrain from visiting your face book, MySpace, twitter, or any other website not related to this course
4. Please refrain from cell phone or mp3 player recharging, uploading, or downloading
5. Respect the computer hardware by using it with care
6. Always log off and take your flash drive before leaving
7. Food and beverage are not allowed in the 200b computer lab
How you will be marked: | |
Criteria | % of total grade |
Lesson Activities | 30% |
Home work | 10% |
Unit Exam | 25% |
Projects | 25% |
Portfolio: (Binder, notebook and being prepared for class) | 10% |
What you will need for this course (supplies)
- A Binder (recycle an old one!)
- A grid paper notebook
- Pencils
- Black Pens
- Flash drive (optional but very useful)
Monday, May 16, 2011

Tuesday, May 10, 2011
Mouse Trap CarFront wheel Design Problem
Design and Drawing for Production
Blocks 3 and 4
Today’s lesson:
Problem: I need a front wheel for my mouse trap car
Design Statement: Design and draw using Autodesk inventor a front wheel for the mouse trap car
Constraints: The size of the wheel should have a 50 mm diameter
• Material: The material that will be used will be rapid prototype medium
• The axle of the wheel must be a 7mm diameter wooden dowel
• Wheel to axle attachment: The wheel must be designed to be fixed tightly so the axle will spin with the wheel.
• Design and manufacture: The wheel design must be made on Inventor using the revolve tool and will be manufactured on a Rapid Prototype machine
Ideas: Use your engineer’s notebook or grid paper to design a front wheel. Your teacher will show you some ways that you can fix a wheel to an axle so that they will rotate together.
The basic design: Open a Standard (mm) IPT file. Use the line tool and the dimension tool to create the profile shown here.
Friday, April 22, 2011

Design and Drawing for Production: Term 4 Final Project: The Mouse Trap Car
These images have been placed on the blog for you reference. If you click on the image it will open in a new window.You can then enlarge it to see the notes more clearly.
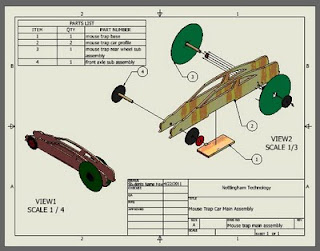
To make changes or add information to the title block:
1. Expand ANSI Title block (click on the +)
2. Right click on edit field text
3. Click on the icon that looks like a sheet of paper in the upper right corner of the edit box
4. Click on Properties
5. Fill in all the information:
6. For Author: Type your Full name
7. For Manager: Type Mr. McGinty
8. For Title: Type the name of the object you will be placing onto your Sheet (example: Mouse Trap Rear CD Wheel)
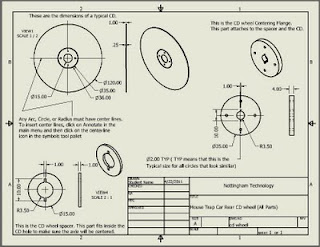
This sheet gives instructions on how to insert a center line or center point. To insert text:
1. Click on annotate in the main menu of a standard dwg file
2. Then click on the big bold A.
3. Then click where you would like the text to appear. A dialogue box will appear
4. Type your text.
5. Click Apply
6. Press escape (ESC) twice
7. Then place your mouse over your text
8. You can then select the text and adjust its location
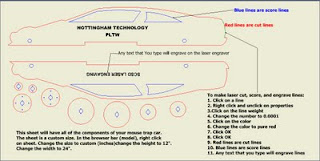
This image shows what your laser engraver dwg file should look like. What components you decide to laser engrave, depends upon each teams design.
Thursday, April 14, 2011
Foundations of Technology Lesson for Friday April 15, 2011

Foundations of technology
Good Afternoon Students!
Please open a Microsoft Word or Power Point presentation
Save as Your name DUCKS
NOw Click here http://tafein2009.files.wordpress.com/2009/03/space2.png?w=500
Use the Drawing tools to make this picture!
Have fun but work Hard!!!
Remember No FaceBook!!
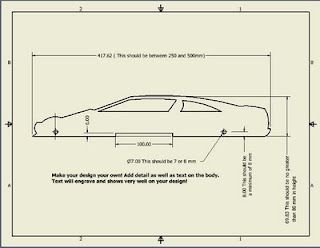
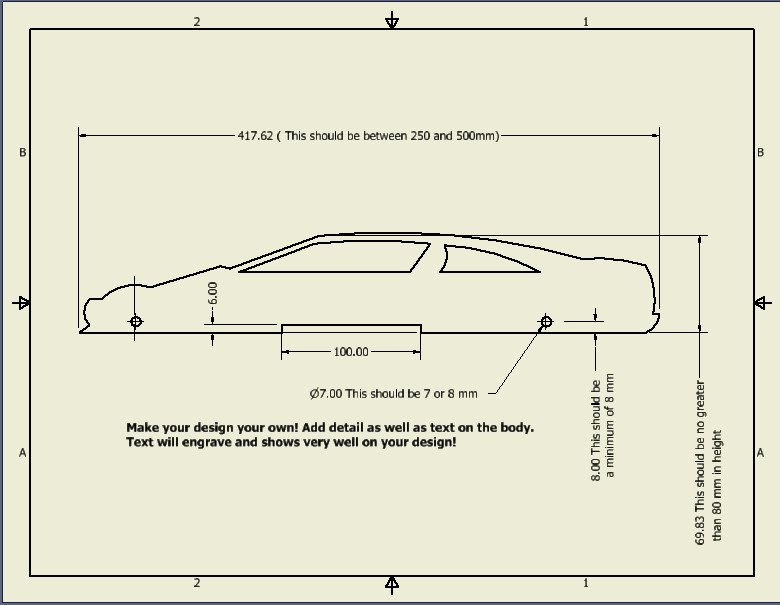
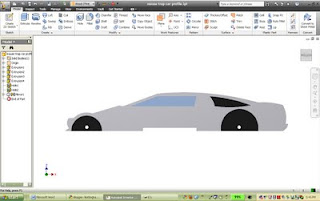
Designing your Mouse trap car Profile for laser Engraving
DDP: Blocks 3 and 4 for Friday April 15, 2011
Good Morning/Afternoon:
1. Logon to computers
2. Click on Autodesk Inventor to start the program
3. When the program opens, click on the Inventor Icon in the upper left corner of desk top and UN-click on open. Open the Auto-desk inventor file that you started on Wednesday (the file was saved as Mouse trap car profile….or what ever name you saved it.)
4. Use the car profile that you researched on Wednesday to assist you in designing the car.
5. Make sure you save your file in your Z drive.
6. Take this lesson seriously! Use your knowledge of Inventor to create a beautiful design!
7. If you draw details like doors, side vents, door handles then make sure you do the following:
a. Make the profile (outer shape) first
b. Extrude Cut the profile from the 500 x 75 piece of balsa wood
c. Click on the face and right click new sketch
d. Draw the detail
e. Finish sketch
f. Extrude cut or join 1 mm
g. When you are done please send an email to:
jmcginty@scsd.us
In the subject place your name and “finished with profile”
Example: Dylan finished with profile
Good Morning/Afternoon:

1. Logon to computers
2. Click on Autodesk Inventor to start the program
3. When the program opens, click on the Inventor Icon in the upper left corner of desk top and UN-click on open. Open the Auto-desk inventor file that you started on Wednesday (the file was saved as Mouse trap car profile….or what ever name you saved it.)
4. Use the car profile that you researched on Wednesday to assist you in designing the car.
5. Make sure you save your file in your Z drive.
6. Take this lesson seriously! Use your knowledge of Inventor to create a beautiful design!
7. If you draw details like doors, side vents, door handles then make sure you do the following:
a. Make the profile (outer shape) first
b. Extrude Cut the profile from the 500 x 75 piece of balsa wood
c. Click on the face and right click new sketch
d. Draw the detail
e. Finish sketch
f. Extrude cut or join 1 mm
g. When you are done please send an email to:
jmcginty@scsd.us
In the subject place your name and “finished with profile”
Example: Dylan finished with profile
Sunday, April 10, 2011
Foundations of Technology Lesson for Monday April 11, 2011 (Block 5)
Foundations Of Technology
Good Afternoon Students!
1. Please Open a Microsoft Power Point File
2. Use the Drawing tools to make this image.
3. Save your project as: Your name Book Cover project

Good Afternoon Students!
1. Please Open a Microsoft Power Point File
2. Use the Drawing tools to make this image.
3. Save your project as: Your name Book Cover project

Monday April 11, 2011 DDP and Foundations of Technology Lessons
Blocks 3 and 4
Monday April 11, 2011
DDP Lesson
Hello Students:
I will not be in class today so please use the instructions below to complete the lesson. Remember to try your best and work together.
Instructions:
- Open an Autodesk Inventor IPT file (you will do this instruction for each of the 9 parts that you will be drawing)
- Get the Hands on AutoCAD LT text book from your teacher. The books are stacked on a table in the back of the gw3 classroom
- You are to draw Problems 1,2,3,4,5,6,8,and 9 on pages 229-231
- DO NOT DO PROBLEM 7
- Each problem should be colored the same color shown in the book.(Use the as material button on the top menu)
- Save each IPT file as either the problem number (1,2,3,4,5,6,8,9) or the figure number (5-85,86,87,88,89,90 to92, 93)
- Remember to save in your “Z” drive as these will be checked by Mr. McGinty on Wednesday April 13, 2011
- All of these problems have holes that need to be placed on the objects. Use the Hole tool in 3D mode of inventor (3D mode is when we Extrude or revolve, for example…its what we do after we click “finish sketch”)
- Remember there are 5 instructions to locate a hole:
- Surface
- vertical reference line and dimension
- horizontal reference line and dimension
- the depth of the hole
- the diameter of the hole
- Here are some hints for specific problems
- For the angle on Problem 6, click on the dimension tool in sketch mode and then click on one line and then the adjacent line. This will give you the angle dimension. Set the angle to 135 degrees

- For problem 8, try to draw the profile that is shown on the right image. Then use the revolve tool. ( a profile is the shape of the revolved object. To remember, look at the wheel that we made in class last week)

- Good luck with this assignment!!!


Subscribe to:
Posts (Atom)