Sunday, April 10, 2011

Foundations of Technology Lesson for Monday April 11, 2011 (Block 5)

Foundations Of Technology

Good Afternoon Students!

1. Please Open a Microsoft Power Point File
2. Use the Drawing tools to make this image.
3. Save your project as: Your name Book Cover project

Monday April 11, 2011 DDP and Foundations of Technology Lessons

Blocks 3 and 4

Monday April 11, 2011

DDP Lesson

Hello Students:

I will not be in class today so please use the instructions below to complete the lesson. Remember to try your best and work together.

Instructions:
  1. Open an Autodesk Inventor IPT file (you will do this instruction for each of the 9 parts that you will be drawing)
  2. Get the Hands on AutoCAD LT text book from your teacher. The books are stacked on a table in the back of the gw3 classroom
  3. You are to draw Problems 1,2,3,4,5,6,8,and 9 on pages 229-231
  4. DO NOT DO PROBLEM 7
  5. Each problem should be colored the same color shown in the book.(Use the as material button on the top menu)
  6. Save each IPT file as either the problem number (1,2,3,4,5,6,8,9) or the figure number (5-85,86,87,88,89,90 to92, 93)
  7. Remember to save in your “Z” drive as these will be checked by Mr. McGinty on Wednesday April 13, 2011
  8. All of these problems have holes that need to be placed on the objects. Use the Hole tool in 3D mode of inventor (3D mode is when we Extrude or revolve, for example…its what we do after we click “finish sketch”)
  9. Remember there are 5 instructions to locate a hole:
    1. Surface
    2. vertical reference line and dimension
    3. horizontal reference line and dimension
    4. the depth of the hole
    5. the diameter of the hole

  1. Here are some hints for specific problems
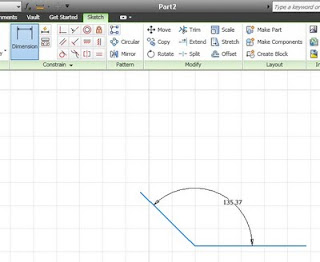
    1. For the angle on Problem 6, click on the dimension tool in sketch mode and then click on one line and then the adjacent line. This will give you the angle dimension. Set the angle to 135 degrees

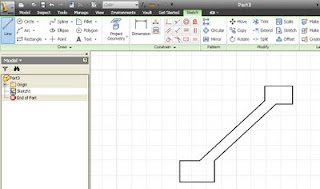
    1. For problem 8, try to draw the profile that is shown on the right image. Then use the revolve tool. ( a profile is the shape of the revolved object. To remember, look at the wheel that we made in class last week)

  1. Good luck with this assignment!!!

Tuesday, April 5, 2011


Here are some images of mouse trap cars that can be found on the web. The "race car" design was manufactured using a Laser engraver which we have access to in gw3.

The term 4 final Project is going to be the design and construction of a Mouse Trap Competition car. Working in a team of three students, you will use the12 step PLTW design process as a guideline to design and construct a mouse trap car for speed, distance and accuracy. Beginning in early May, we will hold a class competition. The top 2 winners of each DDP class will then compete for the Nottingham Cup. The top three winners of the Nottingham Cup will go on to the district Competition to be held on May 11.

Each team must produce a 5 page technical document that meets the SECME (South East Consortium of Minorities in Engineering) constraints that can be found at: http://www.secme.org/docs/competition/2010/guidelines-elementary-mousetrap.pdf

Each team must also produce the following sketches and Autodesk Inventor Drawings:

  • Concept sketches of 5 possible ideas
  • An Isometric Sketch of the chosen idea with color and highlighted in Fine tip sharpie
  • A multi-view sketch of the Final idea that is 1:2 SCALE and dimensioned.
  • Inventor IPT files of all Parts that will be in your final design
  • Inventor Assembly (IAM) and Presentation (IPN) files of the Final design
  • Inventor DWG files Printed that include multi-view and Isometric drawings of each part.
    • One part will include a sectioned view of the part
    • One part will include a detailed section of the part
    • One part will include an Auxiliary view of a part

Monday, February 28, 2011

Welcome Back from Winter break!

DDP Blocks 3 and 4 for February 28, 2011

Welcome back!

Today’s assignment instructions:

Please follow these steps:

  1. Open a Microsoft word document. (Click on start, programs, Microsoft office, and Microsoft office word).
  2. Save the document as your name winter break document (example: Mike winter break)
  3. Open your blue book to 1.3 key terms.
  4. Use the internet as a research tool to find the definition for each term.
  5. For each term:
    1. Define the term (can be copy/pasted)
    2. Write a sentence that uses this term in a meaningful way.
    3. Copy and paste the URL for the website that you used to find the meaning of this word
  6. Each Term is worth 3 points
    1. 1 point for correct definition
    2. 1 point for a meaningful sentence
    3. 1 point for a URL
  7. Raise your hand when you are done to be checked off

DO NOT PRINT THIS DOCUMENT UNTIL INSTRUCTED TO DO SO!!!

Sunday, February 6, 2011

Monday February 7, 2011

Design and Drawing for Production:
Blocks 3 and 4

Lesson Directions: Please open a Microsoft word document and save the document as Your name: 1.2 vocabulary terms ( example: Mike1.2 terms)

Save this document in your "Z" drive

Next open your blue books to the 1.2 terms and do the following for each term:
  1. Type the term ( 1 POINT)
  2. Research on the web and find a definition for the term from the web and copy/paste that definition (2 points )
  3. Copy/ paste the URL (web address) where you found your definition (1 point). Note: ANSWERS.COM WILL NOT BE ACCEPTABLE
  4. Write what this term means to you in your own words or insert an image that that you made which clearly conveys the meaning. If you copy/paste an image from the web, you must also copy/paste the web address or you will earn NO CREDIT. You also must explain in your words what the image means (7 points).

There are 39 terms. You must complete all terms before the end of class.
When you are done please raise your hand so that the teacher can come and check your work.

Here is an example:

The term to be defined:Perspective sketch

Web definition: “The perspective sketch adds realism to the three-dimensional pictorial representation, since it represents the way the human eye inputs visual data. The key element in the perspective sketch is that parallel edge lines converge to a single point (called the vanishing point) along the horizon. If there is just one vanishing point, then it is called a 1-Pt. Perspective. If two sets of parallel edge lines converge to their respective vanishing points, then it is called a 2-Pt. Perspective. There is also the case of a 3-Pt. Perspective in which all vertical lines also converge to a point”

Web Address: http://www.me.utexas.edu/~rbarr/sketching/perspective.html.

What this term means to me: When I look down the hallway of the school, the hall seems to get smaller and smaller the further down the hall I look. If I take a ruler and line it up visually with the edge of the floor and the wall, I can almost see where the vanishing point is and where all the edges of the floor and ceiling will meet


GOOD LUCK!!

Foundations of Technology:
Block 5:

Lesson Directions: Continue to draw all the letters of the alphabet using Auto desk Inventor:
Make Rectangle that is 1.25 wide and 2.0 inches high. Draw letters inside this box. Make sure your letters touch all sides of the box.